|
Back to the download page
BigVEncoder Quick Start GuideOverview and IntroductionBigVEncoder is very versatile. It's primary intention is for streaming live video and audio, however, it has many other uses as well. It can be used as a simple video player to view video files from your hard drive or from the internet. It can be used to re-encode a video or audio file. It can pull streams from just about any source whether it be from a live camera or microphone or from a file or internet stream. Likewise, the output can go to a file or to an internet server or you can simply view it on your screen. Let's take a look at the various parts of BigVEncoder and what you need to know.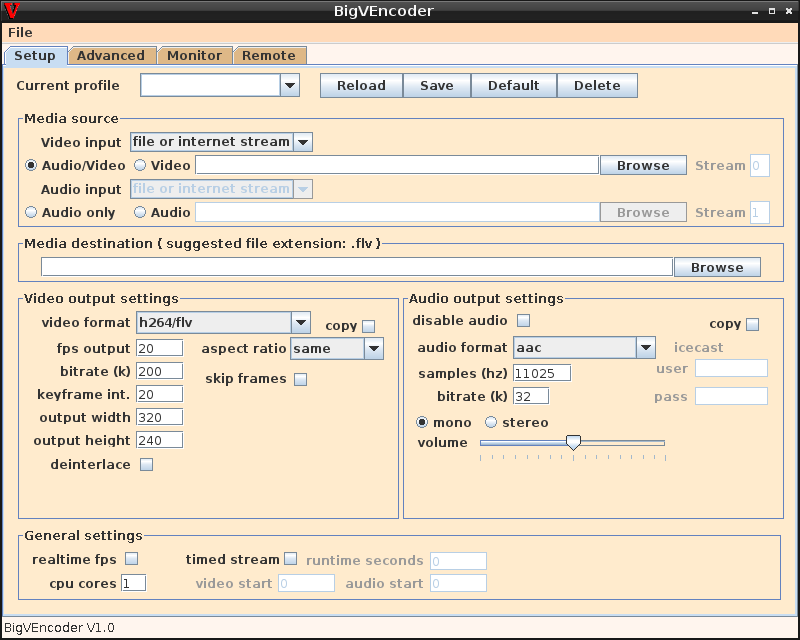
Media sourceOn this page, you can set the location for the source media, which is where the input stream will come from. This can be a file, an internet stream, or a live camera/microphone feed. You set this up in the box that is titled "Media source". In this box, you have radio buttons that identify if the source will contain video and audio from the same location, or if they will be coming from two different locations, or if you will be pulling in audio only. There are two drop down menus that let you decide if the source will be from a "file or internet stream" or from a "capture card" connected to the computer. If you are getting the source from the internet, you will manually type in the URL in the space provided. If the source is from a file on your hard drive, you can either type in the location or click the browse button to select it from a dialogue box and the location will be entered for you.Media destinationIn the Media destination box, you will enter the location where the output is going to go. This can be to a file on your hard drive or it can be to a media server on the internet. If you click the browse button, you can select a folder to save to as well as a new file or an existing file if you wish to overwrite the file. If you are sending the stream to a media server, you will enter the complete URL address in the space provided. This will include the app name and stream name too. For instance, if you are sending an rtmp stream to a server located at "mymediaserver.com" and the app name is "live" and the stream name is "mystream", enter it like this: rtmp://mymediaserver.com/live/mystreamVideo output settingsIn this box, you will enter the settings you would like the resulting video stream to contain. This is quite self-explanatory. Some default settings are already entered for you that will work for most cases. If you are streaming live to the internet, start out with very conservative settings until you learn how much data you can push through your upload connection. This is the most important thing to understand when streaming live video to the internet, most people want to use the largest resolution and highest bitrates, but that doesn't work with slow to moderate internet connections.Audio output settingsJust like the video output settings, this is also quite self-explanatory. Pick the settings that will work for the encoder that is being used. Most encoders will work with the defaults that are initially provided.Setting for Icecast streamingWhile we are looking at the Audio output settings, let's learn how to stream to an Icecast server. First select "Audio only" in the Media source box and enter the audio source. Now, in the Audio output settings box, click the audio format menu and select "mp3/icecast". This entry won't show up until you first click "Audio only". Now, enter the Icecast username and password that is required for the server to accept the stream.General settingsIn the General settings box, you can select "realtime" if you are streaming a recorded video to a media server for live viewing. It will be streamed at the same speed as if it were live. Leave this setting turned off for when you are encoding a video and want it to get done as fast as possible. Enter the number of CPU cores your computer has if you are doing a very CPU intensive task and you would like to make more use of your available resources. For most moderate encoding tasks, 1 or 2 cores works OK. Select "timed stream" if you wish to have the encoding stop after a certain length of time. You can enter the amount of time in seconds. You can also have the audio and video begin a certain number of seconds into the file.ProfilesUp near the top, you'll see "Current profiles". When you get all the settings to work the way you would like, you can save a profile. Just enter a name for the profile and click the Save button. When you restart BigVEncoder, you can select a profile and all the settings will be filled in for you including the location for the source and destination as well as settings found on other pages. If you only have one profile saved, it will automatically be chosen. If you have more than one saved, click the Default button to make the current profile be the default and it will begin with that profile. The Reload button will reload the settings from the profile if you have made changes and wish to revert back to the saved settings. The Delete button will delete the current profile from your computer and will load a different one in its place.Monitor pageNow, let's take a look at the Monitor page.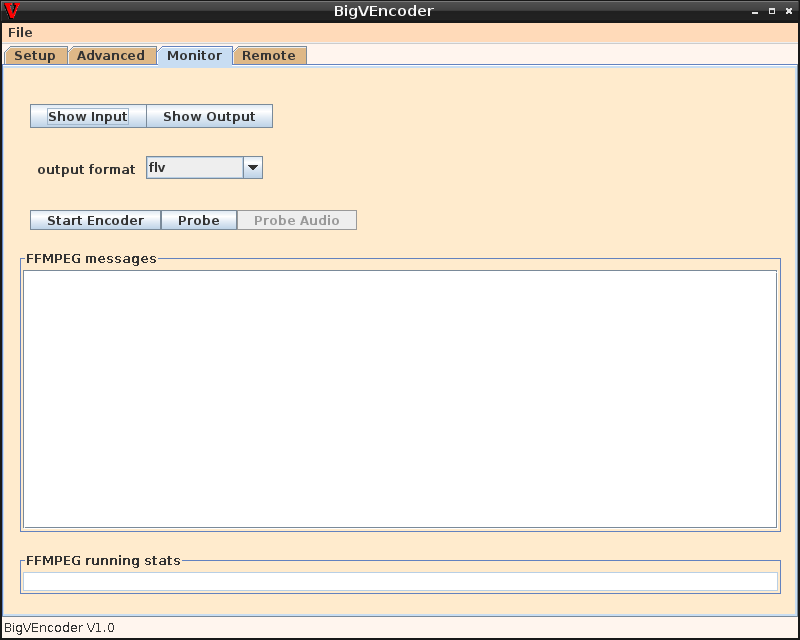
Advanced page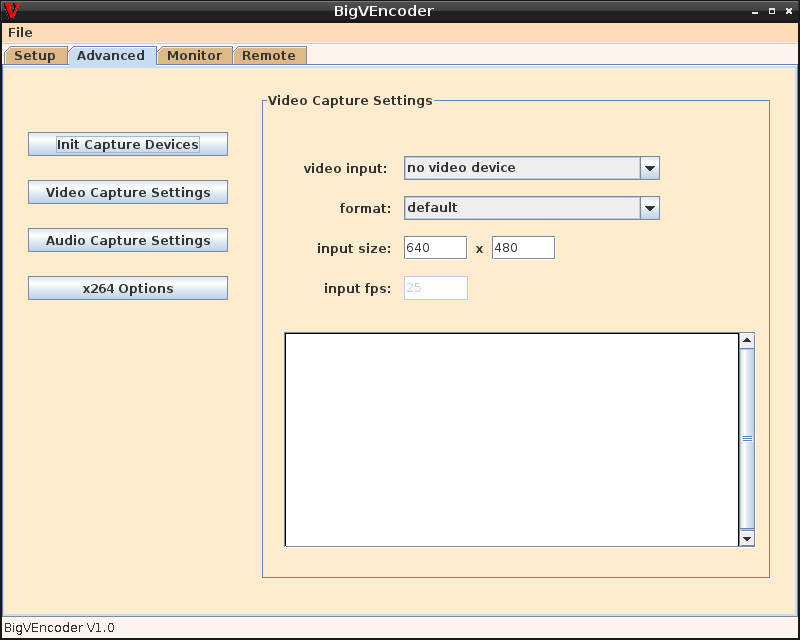
Remote pageI'll save the documentation for the Remote page for a later time. There is a server program that has not yet been released in order to make use of this function. The program is very functional and is being used in-house and will be released soon. To be brief, this feature allows 2 or more BigVEncoders to communicate with one another. One can be set up as the slave while the others are masters. The slave does all the encoding work and is in full control. The masters can see all the settings from the slave as well as the FFMPEG output and can also start and stop the encoder on the slave in addition to being able to change any of the slave's settings. In short, the master has full control of the slave. This allows a camera crew to focus on what they do best, the camera work. Meanwhile, someone else back at the studio can be running the encoder remotely.Tips and TricksWhen streaming live from a camera and/or microphone, it works best if you keep "realtime" turned off. The live stream is already in real time. Testing has shown the encoder to work best with this setting off. Use it when you are streaming a recorded video and wish to simulate a live stream. If your stream isn't smooth, try to determine where the problem is. In many cases, there might be a bottleneck on your outgoing internet connection. When this happens, you usually notice the frame rate dropping or while viewing the output, you might see pauses and jitteriness. Use lower settings such as a lower bitrate or fewer frames per second or a smaller resolution. Sometimes, the performance of your computer is the limiting factor. If you have a single core processor, you might not be able to decode and encode large resolutions and high frame rates. The better the computer is the better you can make your streaming video. However, if you are simply re-encoding an existing video and saving it to your hard drive, it doesn't matter. Use high settings if you want, it will just take longer to get the job done. If the encoder fails to start, there is almost always a clue in the "FFMPEG messages" box. You might find that you have chosen an incompatible x264 profile, for instance. Go to the Advanced page and try a different profile. You also might find that the audio bitrate or sample rate isn't compatible with the audio format you have selected on the Setup page. Sometimes the encoder will fail to start if "auto" is selected for the output format on the Monitor page. Choose a format that you know should be used such as flv or mpegts, etc. If you are encoding in the H264 format and want the best possible quality, go to the Advanced page and choose a preset that is slower than what you usually would use. The slower you go, the more CPU load your computer will have and it will also take more time to encode each frame. For live streaming, this is not the way to go, but for saving to a file on your hard drive, it is OK because it might not matter how long it takes, you are looking for the best quality. For live streaming, choose a faster preset, one that won't slow your computer down. "fast" usually works very well and has decent quality for live internet streaming. Back to the download page |